Showing posts with label Andriod. Show all posts

Thursday, August 8, 2024

How to Increase Download Speed in Chrome for Android (10 Methods)

5:10 AM 0

 Google Chrome for Android has bugs, glitches, and other issues that can ruin a user’s web browsing experience. Recently, many Android users have reported Google Chrome download problems.

According to users, Google Chrome for Android takes forever to complete the ongoing downloads. If you’re dealing with the same issue, follow up with the tips we shared to speed up Chrome downloads.

1. Restart the Chrome Browser

If you are experiencing slow download speeds in Google Chrome for Android, restart the web browser.

This is one of the first things you should do if you’re experiencing slow download speed Chrome for Android for the first time.

All you need to do is close the Chrome web browser and reopen it. After the restart, download your files again.

2. Close all Unused Tabs

Chrome browser actually keeps all unused tabs in the background. Although the inactive tabs won’t use your RAM resources, they adversely affect the browser’s overall performance.

There are likely too many browser tabs running in the background, which affects the download speed. You can close those unwanted tabs to speed up Chrome downloads on Android.

1. Open the Chrome browser and tap the Square icon beside the (+) button.

2. Now, you can see all tabs running in the background.

3. Simply tap the (x) button on the tab you want to close.
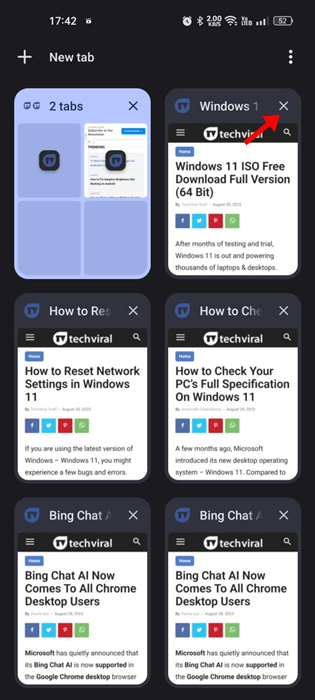
tap the (x) button

4. To close all tabs, tap on the three dots at the top right corner.
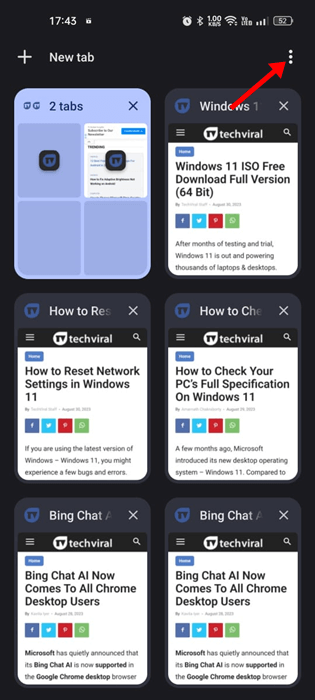
three dots

5. On the menu that appears, select Close all tabs.
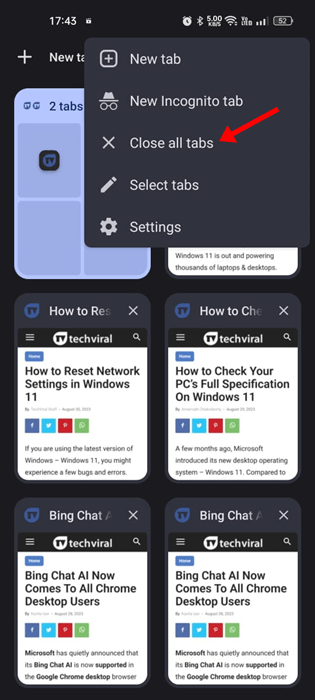
Close all tabs

3. Disable Battery Optimization for Chrome

The latest version of Android has a feature that automatically optimizes battery consumption for the apps. You need to turn off the battery optimization for the Google Chrome browser to fix the slow download speed Chrome for Android issue. Here’s what you need to do.

1. Open the Settings app on your Android device.

2. When the Settings app opens, tap on the Battery.

Battery

3. On the Battery, tap on the More Settings.
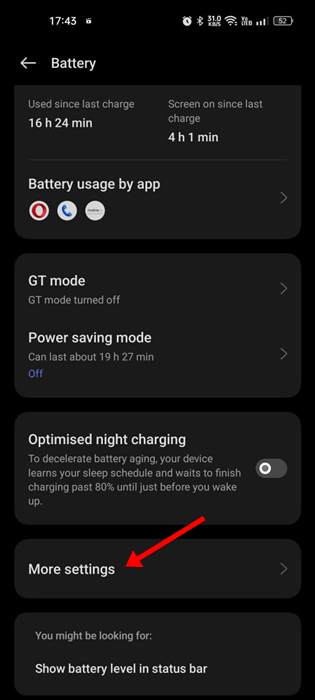
More Settings

4. Now tap on the Optimize battery use.
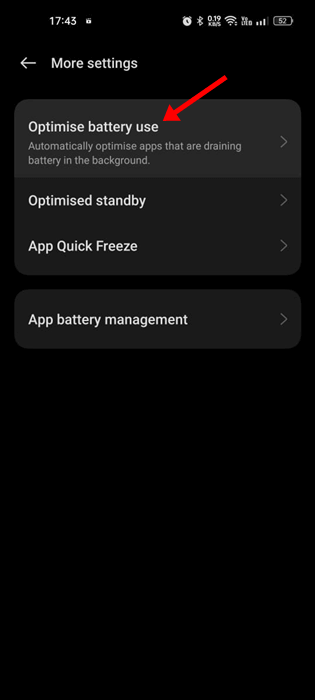
Optimize battery use

5. Find Google Chrome & tap on it.

6. On the menu that appears, select Don’t Optimize.

After making the changes, make sure to restart your Android smartphone. This should fix the slow download speed on Chrome problem on Android.

4. Enable Parallel Downloading on Chrome

Parallel downloading is a Chrome specific feature that accelerates the download speed. The feature is available for all sorts of operating systems, but it needs to be enabled manually. Here’s how you can enable parallel downloading on Chrome.

1. Open the Google Chrome web browser on your Android device.

2. On the address bar, type chrome://flags and press Enter.
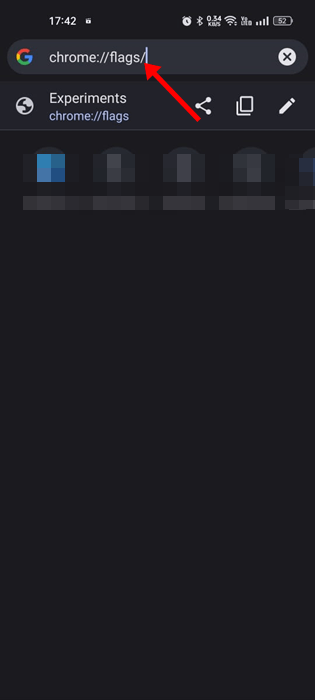
chrome://flags

3. Type in Parallel downloading in the search field.
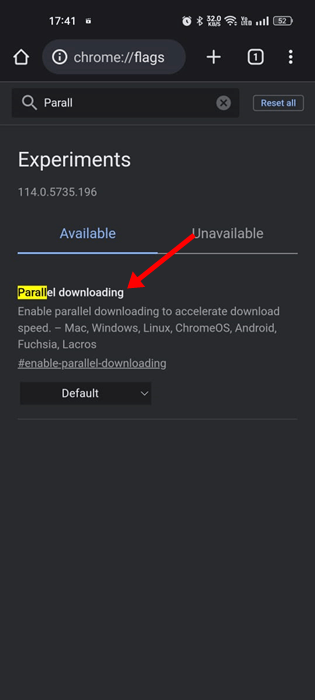
Parallel downloading

4. Tap on the Parallel downloading drop-down and select Enabled.

Enabled

5. After making the changes, tap the Relaunch button at the bottom.

Relaunch

5. Enable Background Data for Chrome

If the Background data is disabled for Chrome for Android, the download will fail once you minimize the web browser. Enabling background data won’t speed up downloads but will reduce the chances of download failures. Here’s what you need to do.

1. Long press the Chrome app icon on your home screen.

2. On the menu that appears, select App info.
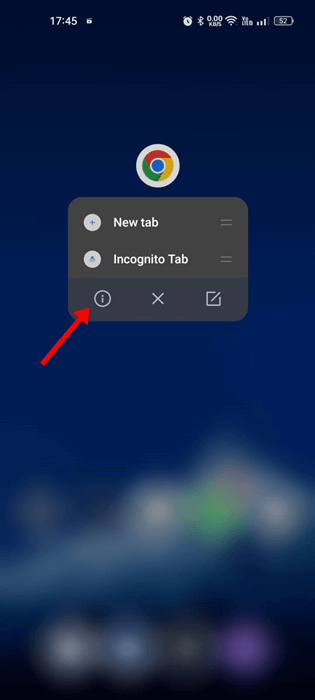
App info

3. On the App info screen, tap on the Data Usage.
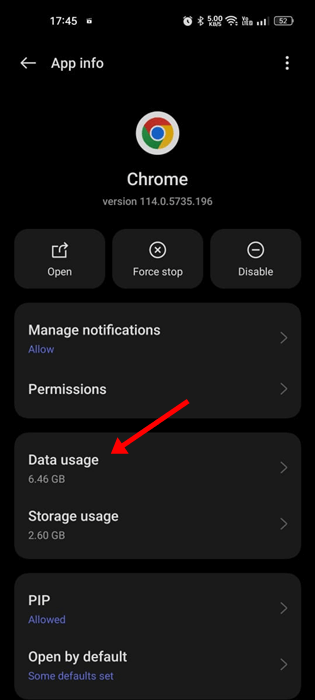
Data Usage

4. On the Data Usage screen, enable the toggle next to the Background Data.

Background Data

6. Turn off the VPN/Proxy Apps

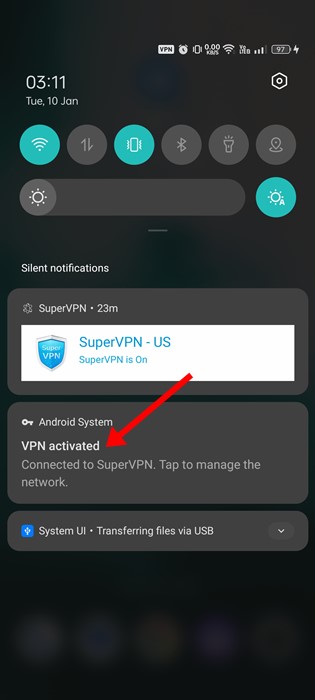
You are using a VPN/Proxy

VPN and Proxy apps can unblock sites for you but can hamper the download speed. VPNs or Proxy apps are never recommended for downloads, as the downloads may fail in case of a connection leak.

So, if you are using VPN or Proxy apps, you can disable them temporarily and resume your downloads. If you still experience slow download speed, you can continue using the VPN/Proxy apps.

If your work involves using a VPN, at least try to use premium VPNs that offer better download speed & minimal connection leak issues.

7. Change the DNS server to speed up downloads

By default, your phone uses the DNS server your Internet Service Provider assigned. The ones assigned by ISPs are often problematic and known for creating slow download issues. The best you can do is to set up a different public DNS server on your Android to speed up Chrome downloads on Android.

1. Open the Google Chrome browser and tap the three dots at the top right.

three dots

2. On the menu that appears, select Settings.
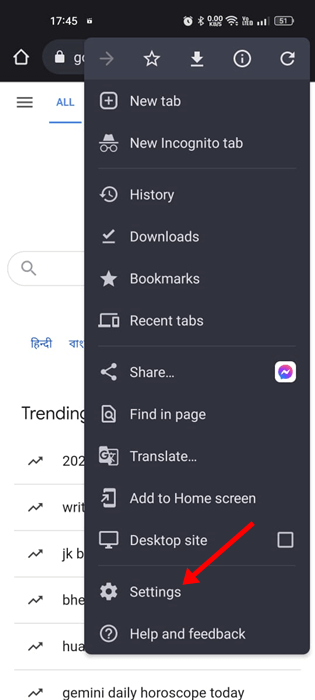
Settings

3. On the Settings, tap on the Privacy and security.

Privacy and security

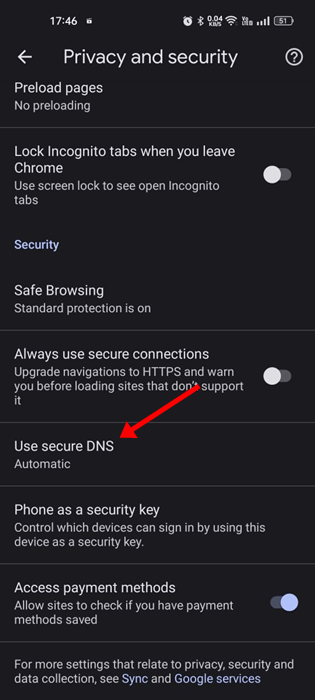
4. Now tap on the Use secure DNS.

Use secure DNS

5. On the Use secure DNS screen, select Choose another provider.

6. Select any public DNS server (Google DNS) is recommended.
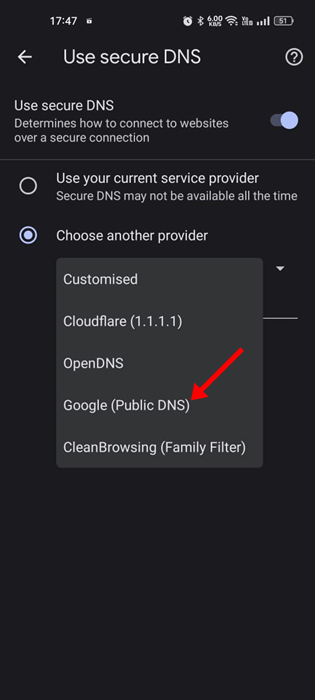
(Google DNS)

8. Clear Chrome Cache & Cookies

Like every web browser, Google Chrome for Android also accumulates cache data to enhance the browsing experience. If this cache data becomes outdated or corrupted, Chrome may download your files slowly.

You will even face problems related to download stopping on Chrome for Android. You need to clear the Chrome Cache & Cookies to resolve such issues. Here’s what you need to do.

1. Open the Chrome browser on your Android and tap on the three dots.

three dots

2. From the list of options that appears, tap on Settings.
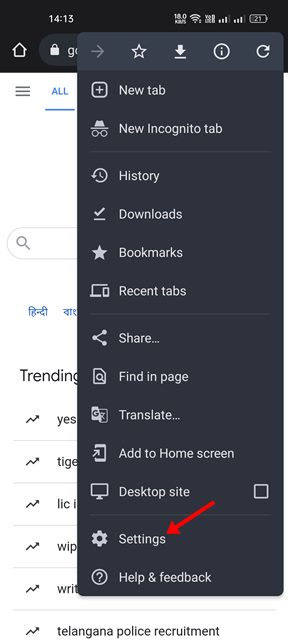
Settings

3. On the Settings, tap on the Privacy and Security.
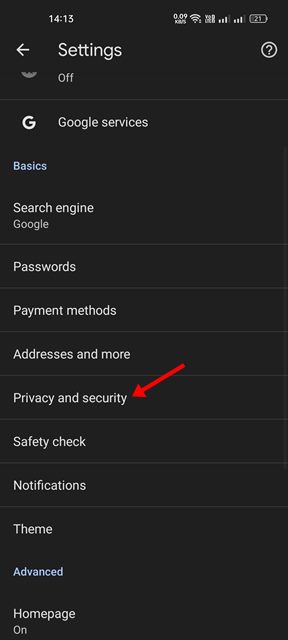
Privacy and security

4. On the Privacy and Security page, tap on Clear browsing data.
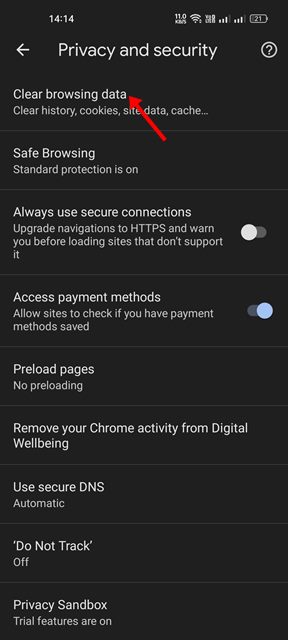
Clear browsing data

5. Check the options – Browsing History and Cookies and Site Data.
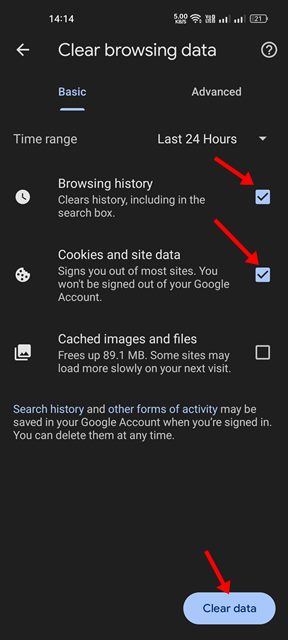
clear data

6. Now tap on the Clear Data button at the bottom right.

9. Update Google Chrome
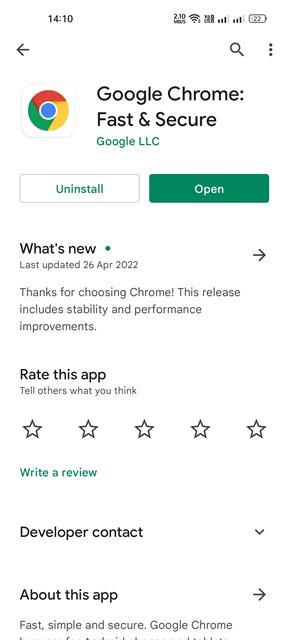
Update the Chrome Browser

Keeping apps up-to-date is a good idea as it brings new features, bug fixes, security patches, etc. Chrome updates often bring more stability & features to improve the user experience.

Your browser version may have a bug or glitch that conflicts with the downloads, leading to slow download speeds.

So, you need to head to the Google Play Store and install all available updates. You must tap the Update button on the Google Play Store’s Google Chrome app listing page. This will update the browser.

10. Reinstall the Chrome browser
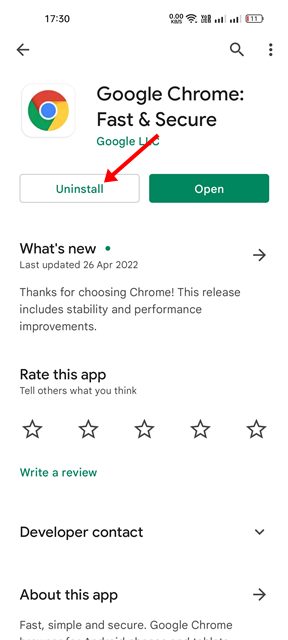
Uninstall

If nothing worked in your favor and the slow download speed issue is still prominent, you must reinstall the web browser.

Reinstalling will delete the history, data, and cache files. To reinstall the Chrome browser, open the Google Play Store and search for Google Chrome.

Next, open the Google Chrome app listing and select Uninstall. Once installed, tap on the Install button again.

These are some of the best and most effective methods for increasing Google Chrome download speed on Android. In the comments below, let us know which method worked for you to speed up Chrome downloads.

Wednesday, August 7, 2024

How to Fix ‘System UI Not Responding’ Error on Android (10 Methods)

7:31 AM 0

 Android is an operating system that’s never known for its stability. It’s common for Android users to face network errors, app errors, etc. Many users reportedly got the ‘System UI not responding’ error message recently.

Actually, ‘System UI Not Responding’ is not new; it has now become a common error and can appear on all Android versions. The error message is most commonly seen on Samsung, LG, and Motorola devices, but sometimes it also appears on other Android smartphones.

What Does ‘System UI Not Responding’ Means?

Before you look for ways to troubleshoot the issue, it’s important to understand what exactly the System UI Not Responding Means.

If your Android phone says System UI Not Responding, it means that the user interface has stopped working.

The user interface may stop working for various reasons like glitchy apps, malware, outdated Android versions, running incompatible apps, etc.

When the error message appears, the Android screen freezes and becomes unresponsive. Restarting is the only way to make Android responsive again.

Why does the ‘System UI Not Responding’ Error appear?

The error message generally appears when the system becomes unresponsive. Here are the most common reasons for the System UI Not Responding Error message.

  • Lack of internal storage
  • Outdated or corrupted app cache.
  • Malicious applications.
  • Damaged SD card.
  • Corrupted System Files.
  • Low Amount of RAM available.

How to Fix ‘System UI Not Responding’ Error on Android

Now that you know all possible reasons for the ‘System UI Not Responding’ error message, troubleshooting becomes easy. If you are getting the System UI Not Responding error on your Android, here’s what you can do to resolve it.

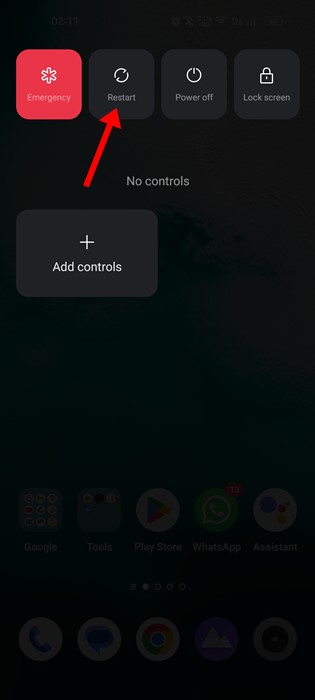
1. Restart your Android smartphone

Restart your Android smartphoneThe very first step includes restarting your Android smartphone. Restarting the Android will immediately fix the ‘System UI Not Responding’ error, but it’s a temporary solution.

So, if you just want to use your Android smartphone and don’t have time to resolve the issue permanently, the best you can do is restart the device.

Restarting will make your System UI app responsive again, and if the UI isn’t responding due to a glitch, you won’t face the problem anymore.

2. Clear the Cache of the System UI App

System UI is a system app hidden from the user; when the cache file of the app becomes outdated, it becomes unresponsive and shows you the ‘System UI has stopped working’ error message.

So, you can try clearing the System UI app cache to fix the error message. Here’s what you need to do.

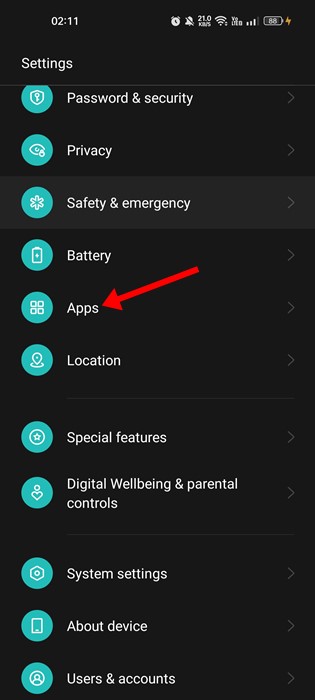
1. Open the Android app drawer and tap on the Apps.

Apps

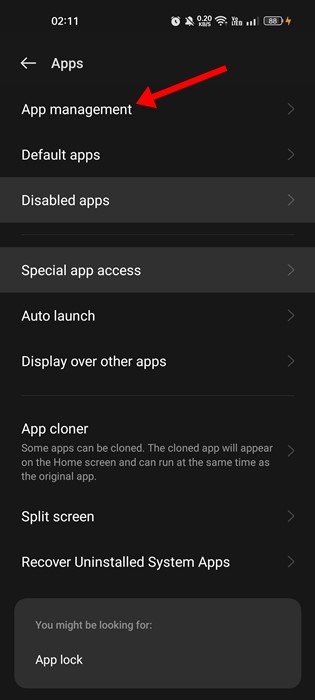
2. On the App, select All Apps or App Management.

App Management

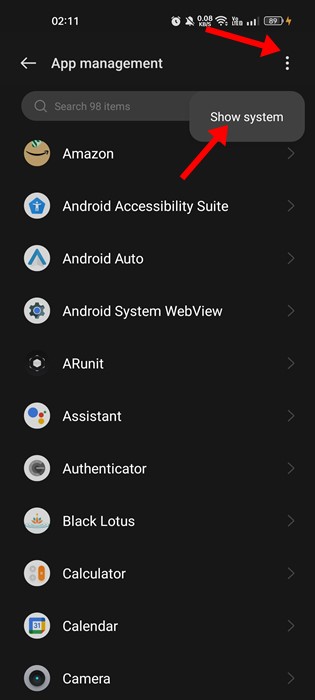
3. On the next screen, tap the three dots in the top-right corner and select ‘Show System‘.

Show System

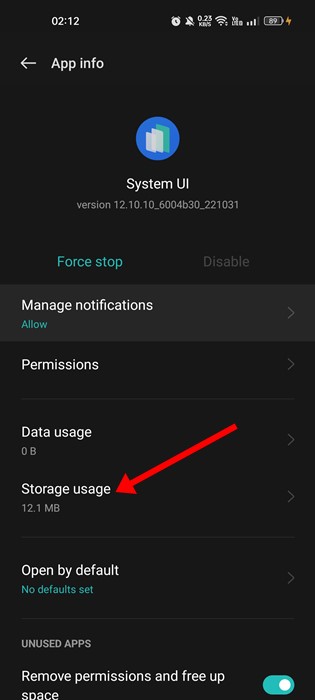
4. Now, find the System UI app and tap on it. Next, tap on Storage Usage.

Storage Usage

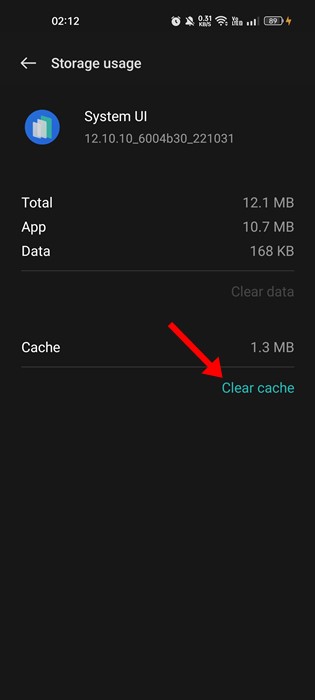
5. On the Storage Usage screen, tap the Clear Cache option.

Clear Cache

That’s it! This is how you can fix the System UI Not Responding error message on your Android smartphone.

3. Clear Google Play Services Cache

Many users have claimed to fix the System UI error message by clearing the Google Play Services Cache. Hence, you can do it as well. Here’s how to clear the Google Play Services Cache on Android.

1. Open the Android app drawer and tap on the Apps.

Apps

2. On the App, select All Apps or App Management.

App Management

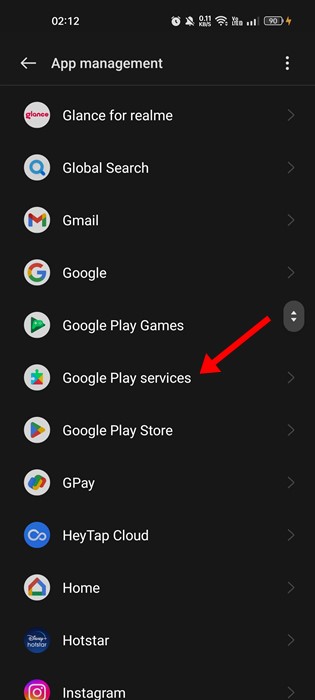
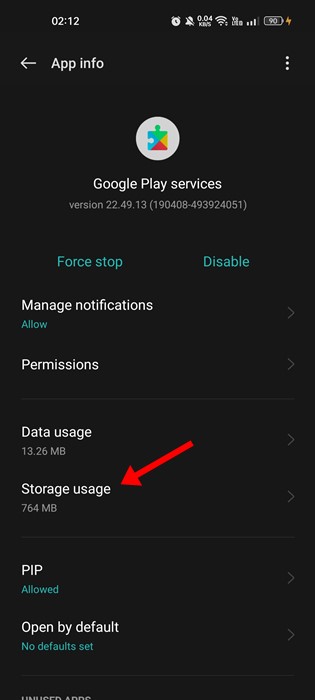
3. On the next screen, find the Google Play Services app and tap on it.

Google Play Services

4. On the Google Play Services App info screen, tap on Storage Usage.

Storage Usage

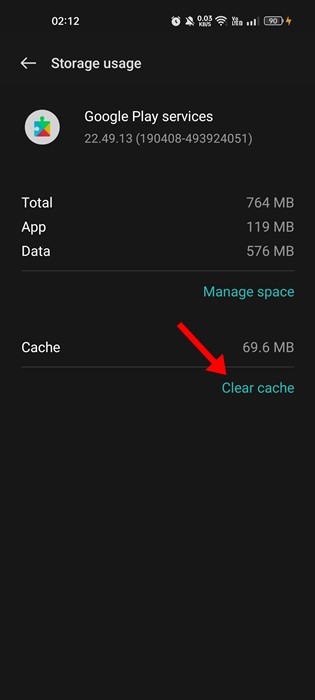
5. Next, tap on the Clear Cache option.

Clear Cache

That’s it! This is how you can clear the Google Play Services cache to resolve Android’s System UI Not Responding error.

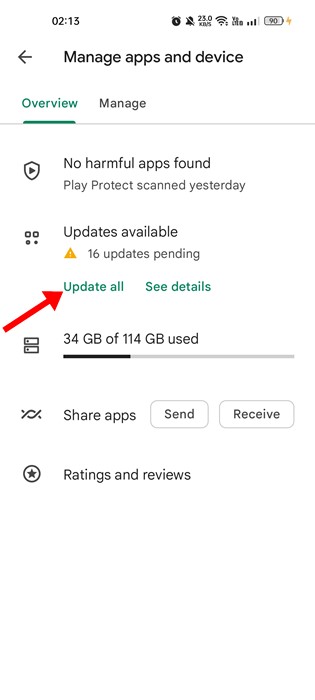
4. Update All Apps from the Google Play Store

Sometimes, bugs in outdated apps trigger the System UI error message. So, if outdated apps are the reason for the System UI Not Responding error, you need to get all your apps updated from the Google Play Store.

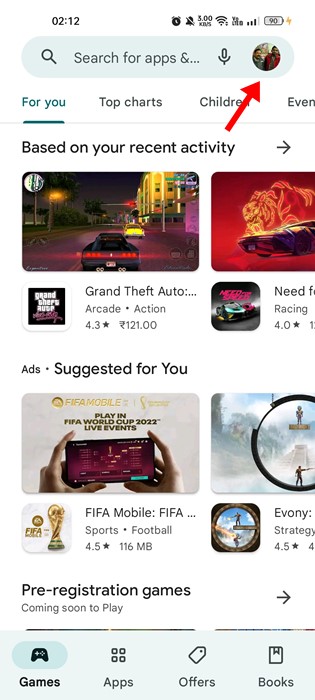
1. Open the Google Play Store and tap on your profile picture.

profile picture

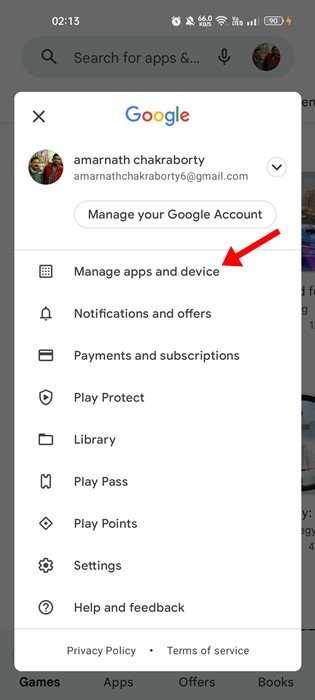
2. On the prompt that appears, tap on Manage Apps and Devices.

Manage apps and devices

3. On the Manage apps and device, tap the Update All option.

Update all

That’s it! This will update all your Android apps. Ensure you are internet-connected while Google Play Store updates all your Android apps.

5. Uninstall the Third-Party Apps

As we all know, incompatible or malicious apps can prevent the System UI Services from functioning properly.

When malicious apps conflict with the system UI services, it can trigger an error message. So, you need to recall all third-party apps you’ve installed.

If you can’t recall the apps, open the App Drawer and check all the apps you already have. Simply uninstall the apps that you no longer use or are suspicious of.

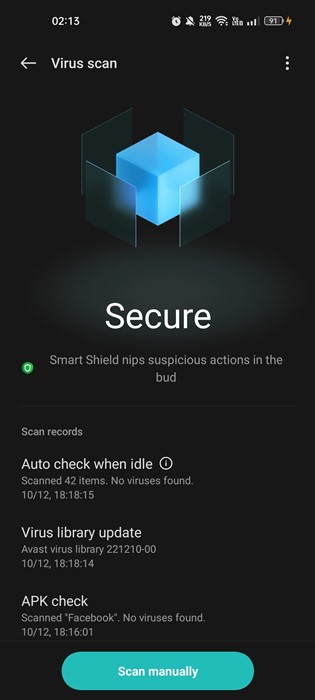
6. Run a Full Virus Scan

Run a Full Virus Scan

Viruses and malware are other prominent reasons behind the ‘System UI Not Responding’ error message.

Sometimes malware resides on your device and consumes the RAM resources. So, it could be malware raising the Memory usage and making the system UI unresponsive.

Since it’s difficult to detect malware, you must use a third-party antivirus app on your smartphone. For a list of security apps for Android, check our guide – Best Android Security Apps You Must Have.

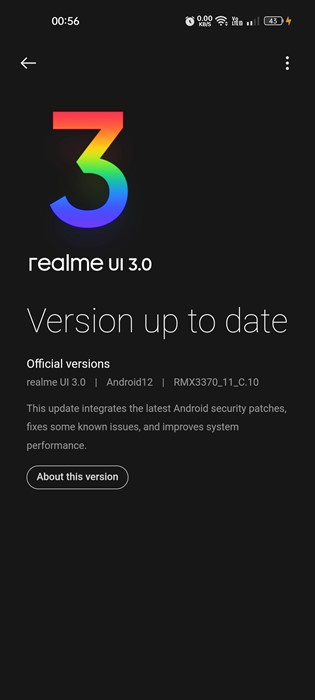
7. Update Your Android Version

check for the system updates

If your Android System files have been corrupted, you cannot resolve it. The only thing you can do is update your Android version.

Updating the Android version will also rule out OS bugs. So, connect your phone to the internet and check for all available updates.

You can check Android updates by navigating to Settings > About Device > System Updates. On the System Updates, download and install if there are any pending updates.

8. Reset Your Device

If everything fails to fix the ‘System UI Not Responding’ error message on your Android, you have no option other than resetting the device.

However, resetting the device will erase all installed apps, settings, and saved data. So, make sure to back up all your important files before you reset your device. To reset your Android, follow the steps shared below.

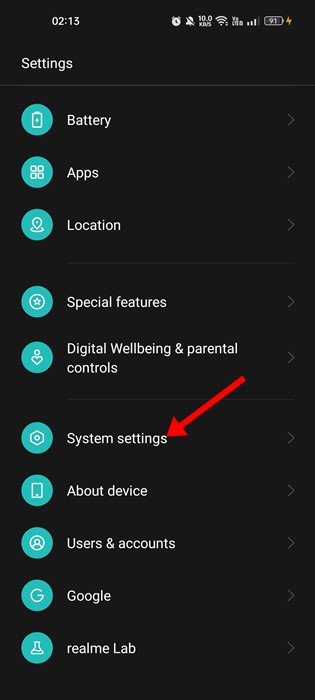
1. First of all, open the Settings app on your Android.

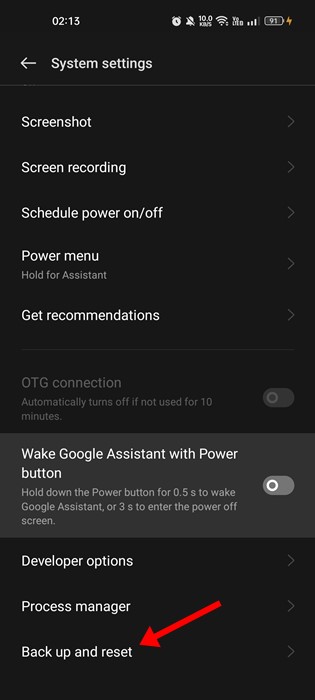
2. On Settings, scroll down and tap on System Settings.

System Settings

3. Next, scroll down to the bottom, tap on the Back up and reset.

Back up and reset

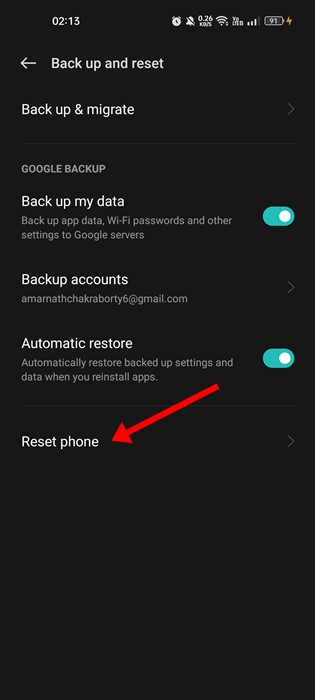
4. On the Back up and reset screen, tap the Reset Phone.

Reset Phone

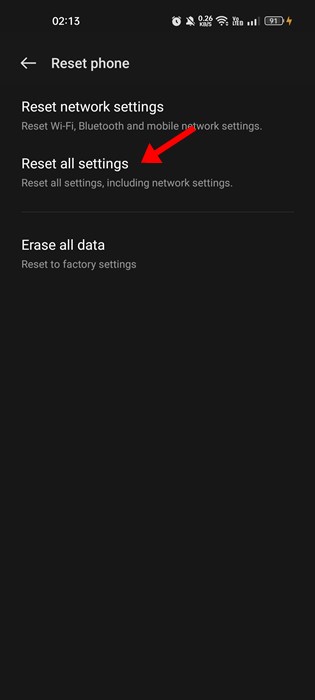
5. On the next screen, tap on Reset all settings.

Reset all settings

That’s it! This is how you can reset your Android device.

9. Wipe Cache Partition

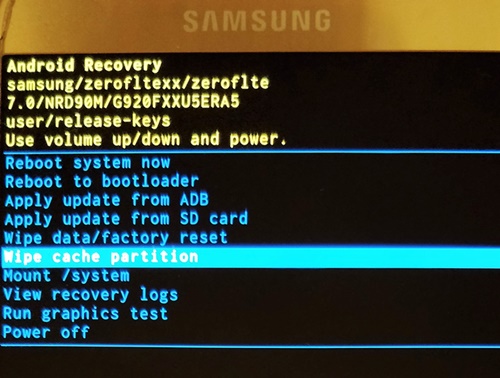
Wipe Cache Partition

We have listed this solution toward the end because it’s a little bit complicated. You can wipe the cache partition of your Android if every method has failed to fix the problem for you.

You must boot into Android’s recovery and then wipe the cache partition. Since the recovery screen has no graphical user interface, selecting the wrong option and damaging the device is risky.

So, ensure you’ve followed all the methods we have shared above; if the issue isn’t fixed, follow these steps to clear the cache from recovery.

  • Power off your phone and load into the bootloader screen using the key combination (Power button + Volume Down button simultaneously).
  • On the bootloader screen, use the volume keys to select Recovery.
  • Now press the Power key to select Recovery.
  • On the Recovery screen, select Wipe Cache partition.

That’s it! Now, wait until the cache gets cleared. This will wipe the cache partition on your Android.

10. Look for Hardware Issues

System UI Not Responding error is not usually linked with hardware issues, but if the issue is still not fixed, even after wiping the cache partition, it’s time to look for hardware issues.

A fault in a hardware component can trigger System UI related issues on your Android smartphone. The best you can do is to take your phone to the local service center and ask them to resolve the issue.

Also read: How To Run Android Apps On Mac OS

System UI Not Responding could be irritating, but it’s becoming a common error every Android user deals with. You can follow these methods to easily fix the System UI Not Responding error on your Android. If you need more help resolving the System UI error on Android, let us know in the comments below.