Showing posts with label Windows. Show all posts

Thursday, August 8, 2024

Download Snipping Tool (Latest Version) for Windows 11/10

5:00 AM 0

 You don’t really need a screenshot utility on the Windows operating system to capture a screenshot. The operating system ships with a few tools to capture a screenshot. On Windows, you can use the default Print Scr (Print Screen), Xbox Game Bar, or Snipping Tools to capture a screenshot.

Both Xbox Game Bar & Print Scr take a full-page screenshot, but if you have to capture a specific part of your screen, you must utilize the Snipping Tool. Snipping Tool is available on all versions of Windows, including the latest Windows 11.

What is a Snipping Tool?

The snipping tool is basically a screenshot utility that ships with the Windows operating system. The free screenshot tool for Windows provides various modes to capture a screenshot. Here are the types of snips you can capture with the Snipping Tool.

Free Form Snip: This mode allows you to draw a free-form shape around an object.

Rectangular Snip: When this mode is selected, you will have to drag the cursor around an object to form a rectangle.

Window Snip: When this mode is selected, you must select a window, like a dialog box, that you want to capture.

Full Screen Snip: This mode captures everything displayed on the screen.

Video Snip: This one captures a video clip of a rectangular selection of any part of the screen.

After selecting the capture mode, you will have to capture a snip. Once a snip is captured, it’s automatically copied to the Snipping Tool Window, where you can make changes, save, & share.

Download Snipping Tool for Windows Latest Version

If you are using the latest version of the Windows operating system, the Snipping Tool might already be available to you. You can access it from the Windows 11 search or by pressing the Windows + Shift + S button on your keyboard.

However, if there’s no Snipping Tool available on your PC, you need to download it from the Microsoft Store. Below, we have shared some of the best ways to download Snipping tool for Windows 11.

1) Download Snipping Tool from the Microsoft Store

In this method, we will use the Microsoft Store app to download the Snipping Tool. Here’s how to download Snipping tool for Windows 11 from the Microsoft Store app.

1. First, open the Microsoft Store app on your Windows PC.
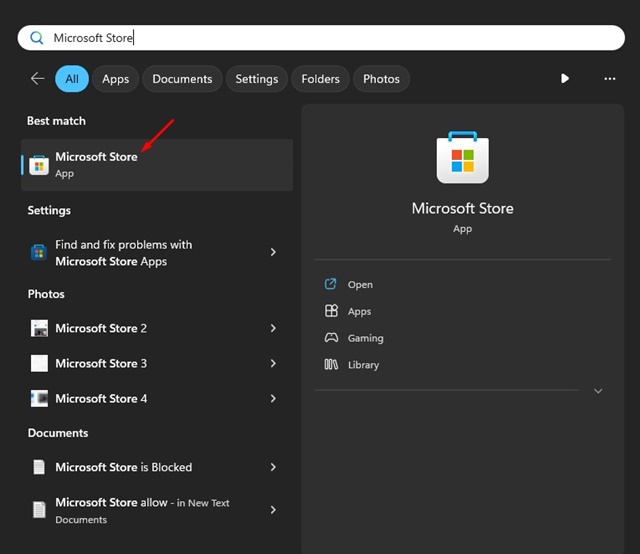
Microsoft Store

2. When the Microsoft Store opens, search for Snipping Tool.
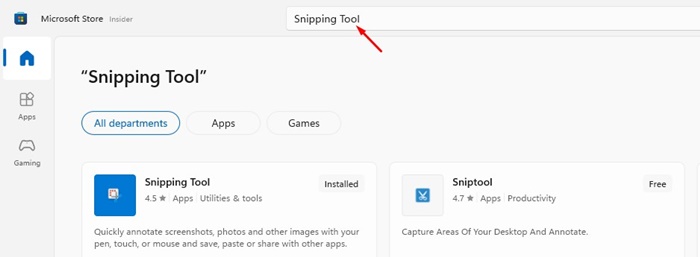
Snipping Tool


3. Now open the Snipping Tool app from the list of results.
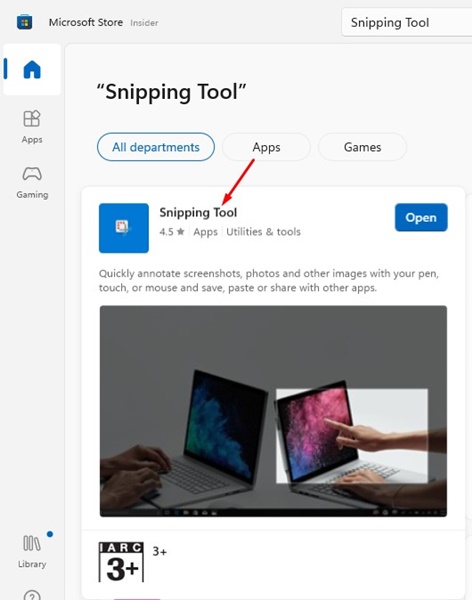
Snipping Tool app

4. If the Snipping Tool is unavailable on your computer, click the Get button. If it’s already installed, you will get the option to open it.
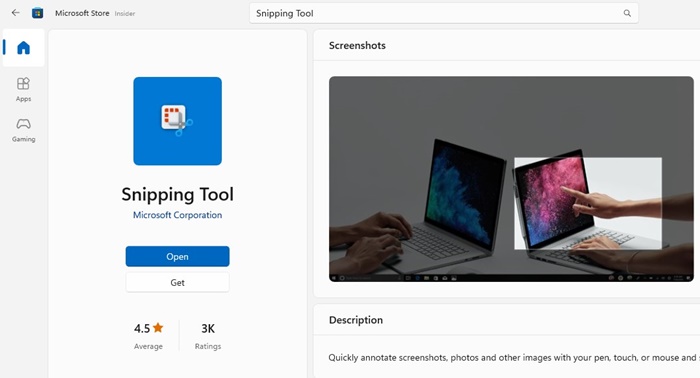
option to open it

5. Now wait until Snipping Tool installs on your device.

That’s it! This is how you can download & install Snipping Tool on Windows from the Microsoft Store app.

2) Download Snipping Tool from the Google Drive

If you want to manually download & install the Snipping tool on your computer, it’s best to download the MSIX file shared on Google Drive and install it manually. Here’s what you need to do.

1. Launch your favorite web browser and visit this webpage.

2. When the Google Drive link opens, download the entire file.
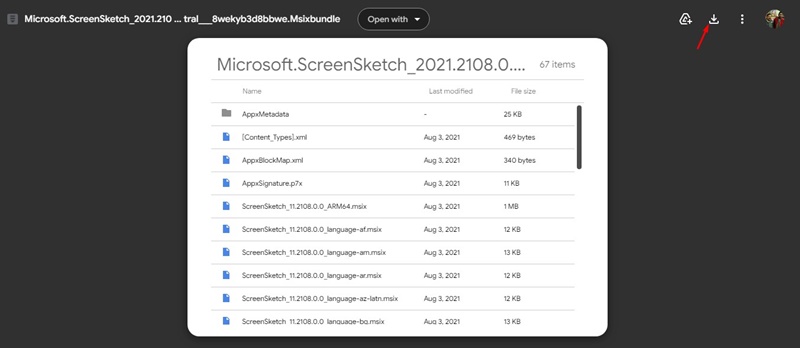
download the entire file

3. Now, move back to the downloads folder. Find the MSIX file you’ve just downloaded & run it.
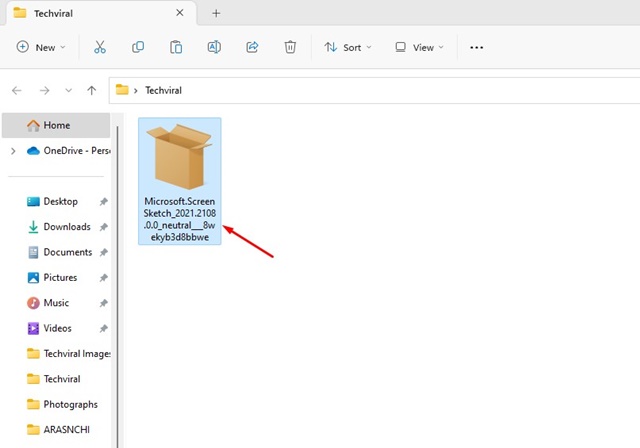
MSIX file

4. Now you will see the Install Snipping Tool? Prompt. Click on the Install button to continue. If the Snipping Tool is already available, you will see a different prompt asking you to Reinstall or Launch the application.
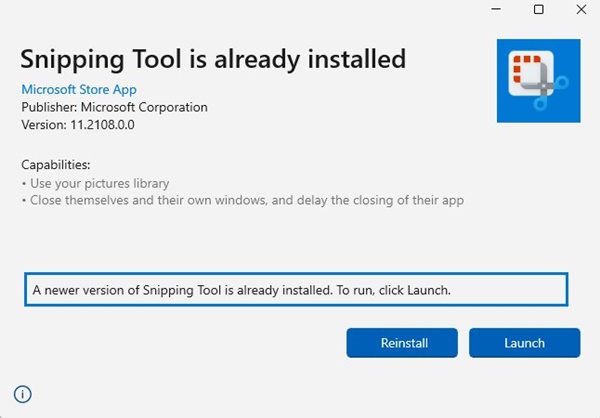
Reinstall or Launch the application

That’s it! This will immediately install Snipping Tool on your Windows PC.

Download the New Snipping tool for Windows 11

Microsoft recently released a new Snipping tool in its Dev & Canary Builds of Windows 11. You can download the new Snipping tool and use it straight away. Here’s how you can download the new Snipping tool for Windows 11.

1. Open this webpage from your favorite web browser.

2. When the page opens, choose ProductID on the left drop-down. On the search field, paste 9MZ95KL8MR0L.
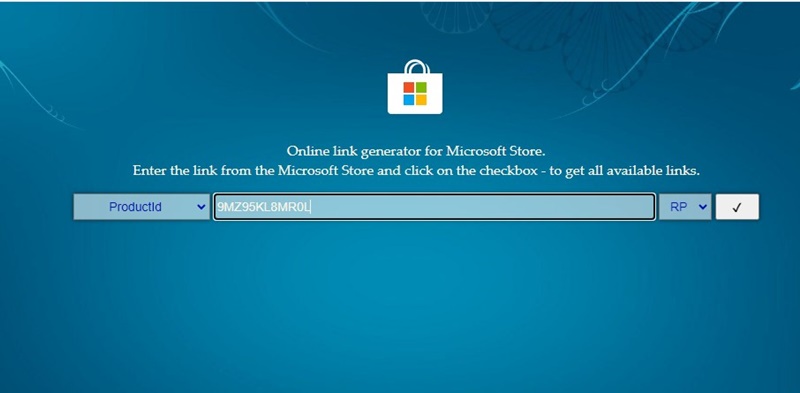
9MZ95KL8MR0L

3. On the right drop-down, select Fast. Once done, click on the check mark button to search the ProductID.
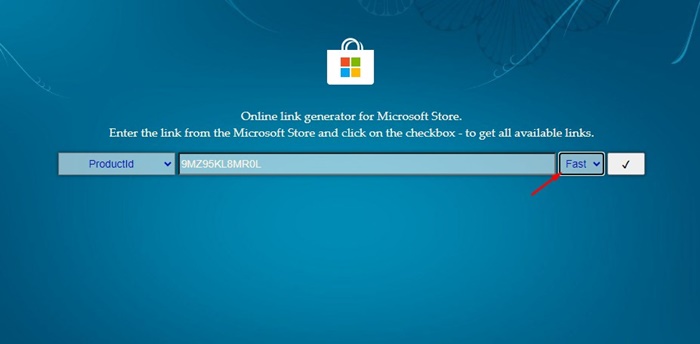
Fast

4. On the search result, find version 2022.2308.33.0 with the MSIXBUNDLE extension.
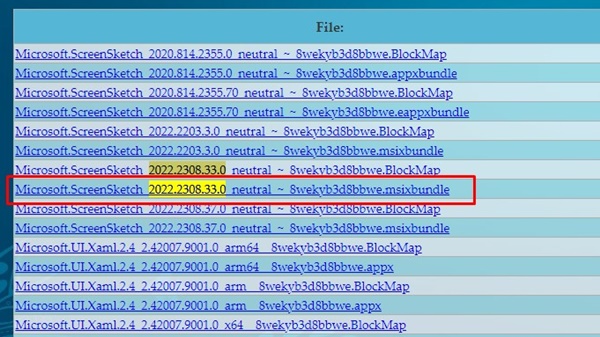
2022.2308.33.0

5. Right-click on the MSIXBUNDLE extension, right-click on it, and select Save Link As.
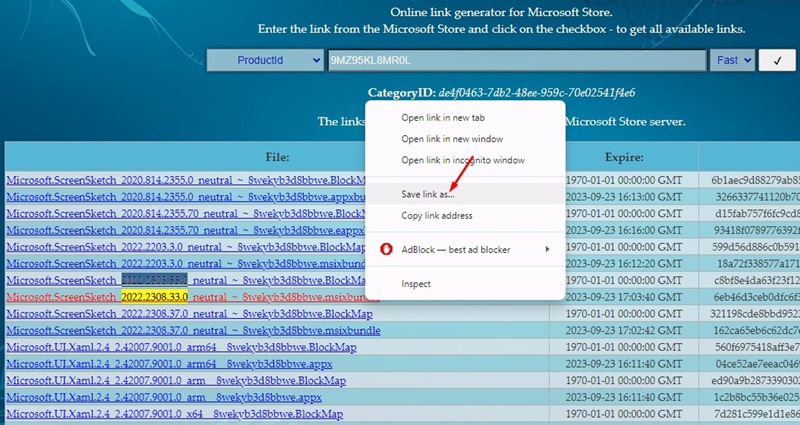
Save Link As

6. Once the file is downloaded, double-click on it to run it.
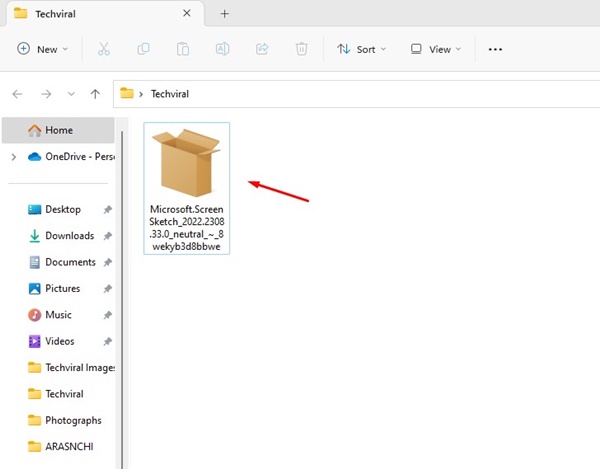
MSIXBUNDLE


7. If Snipping Tool is previously available on your Windows 11, you will get the option to Update.
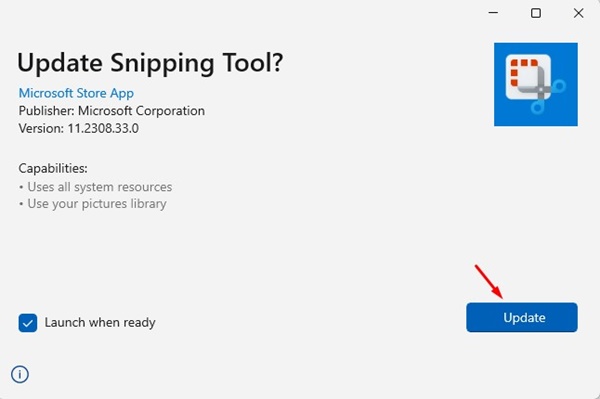
Update

That’s it! The new Snipping Tool has a feature called Text Actions. The Text Actions lets you copy texts from a screenshot on Windows 11. If you need more details on how to copy text from an image, check our guide – How to Copy Text from screenshot in Windows 11.

How to Uninstall Snipping Tool?

If, for any reason, you don’t want to use the Snipping tool utility, you can uninstall it easily. Here’s how to uninstall the Snipping Tool on Windows 11.

1. Open the Settings app on your PC & switch to the Apps section.
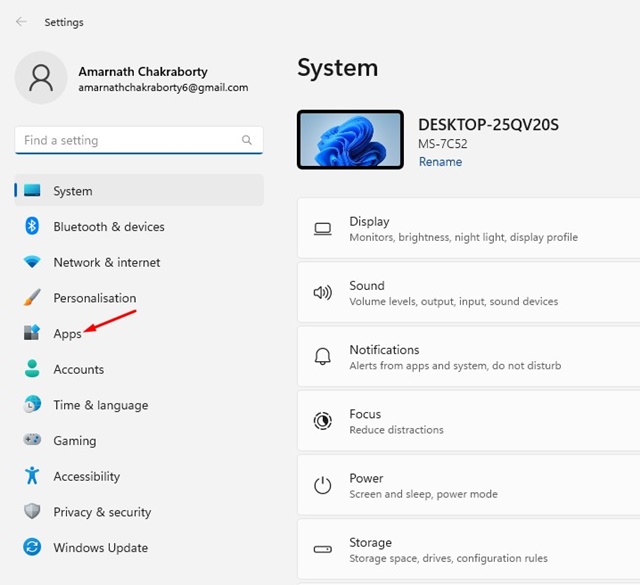
Apps

2. On the right side, click on the Installed Apps.
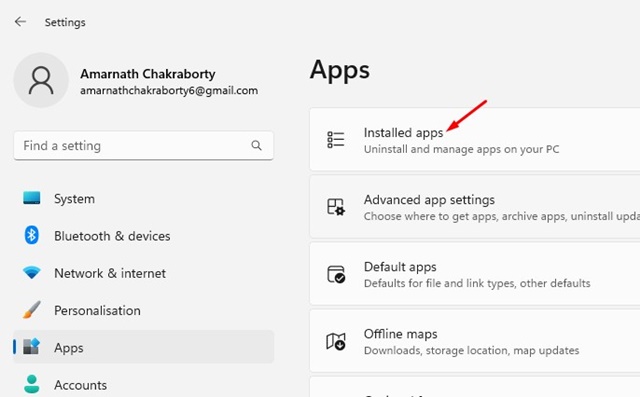
Installed Apps

3. Now, search for Snipping Tool.

Snipping Tool

4. Right-click on the three dots next to Snipping Tool.
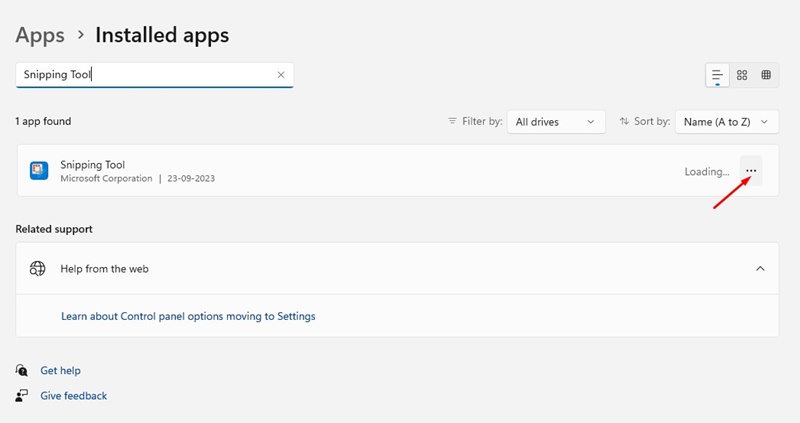
three dots

5. On the menu that appears, select Uninstall.
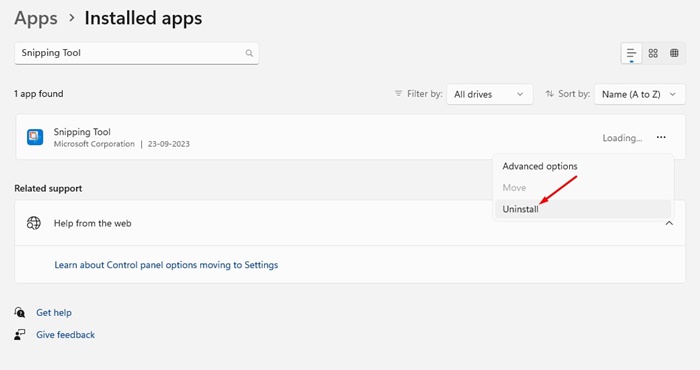
Uninstall

6. Once again, click on the Uninstall button.
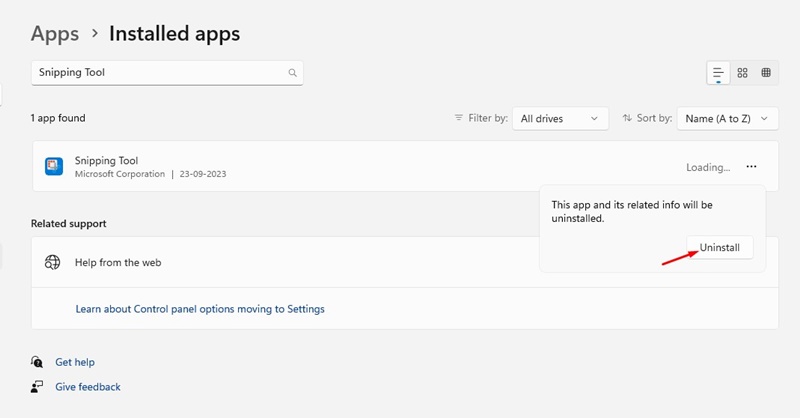
Uninstall

That’s it! This is how you can uninstall the Snipping Tool from your Windows computer.

So, this guide is all about how to download the Snipping Tool for Windows. We have shared all working methods to download the free screenshot utility – Snipping Tool for Windows 10/11 computers. Let us know if you need help understanding certain Snipping Tool features.

How to Enable Taskbar End Task on Windows 11

4:48 AM 0

 Windows 11 has a very handy option to kill all nonresponsive apps and services. You can access the Task Manager and ‘End Task’ the process or app that isn’t responding or acting weird.

While it’s easy to ‘End Task’ the unresponsive programs on Windows 11, it wouldn’t be great if we had the ‘End Task’ option right on the Windows 11 Taskbar.

The latest builds of Windows 11 have a feature that adds the ‘End Task’ button directly on the Windows 11 Taskbar, preventing the need to access the Task Manager to force-close the not-responding apps.

How to Enable Taskbar End Task on Windows 11

So, if you are interested in force closing apps directly from the Windows 11 Taskbar, you would like to have the Taskbar’s End Task feature. Here’s how to add the feature on Windows 11.

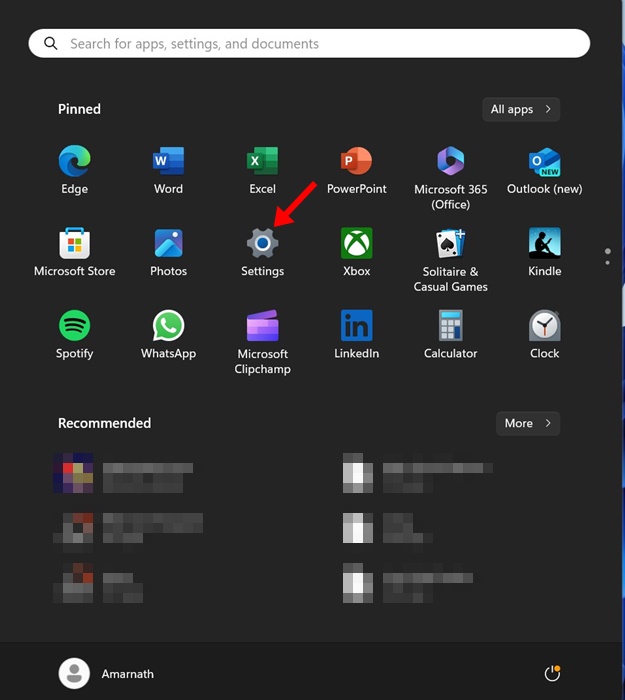
1. To get started, launch the Settings app on your Windows 11 Computer. Press the Windows + I button on your keyboard to open the Settings.

Settings

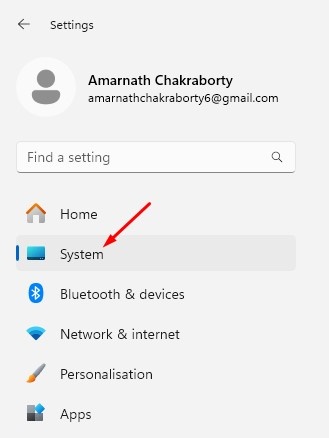
2. When the Settings app opens, switch to the System tab.

System

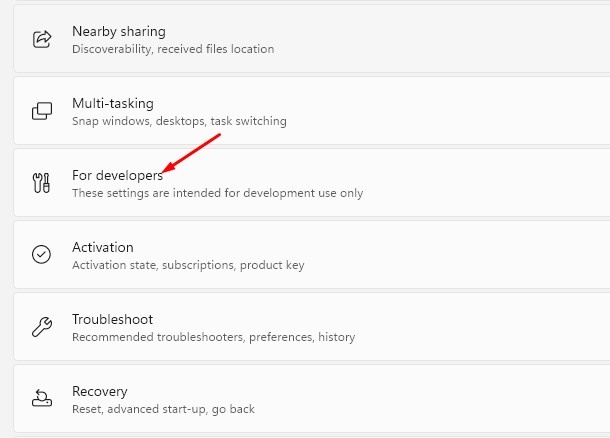
3. On the right pane, scroll down a bit and click on For Developers.

For Developers

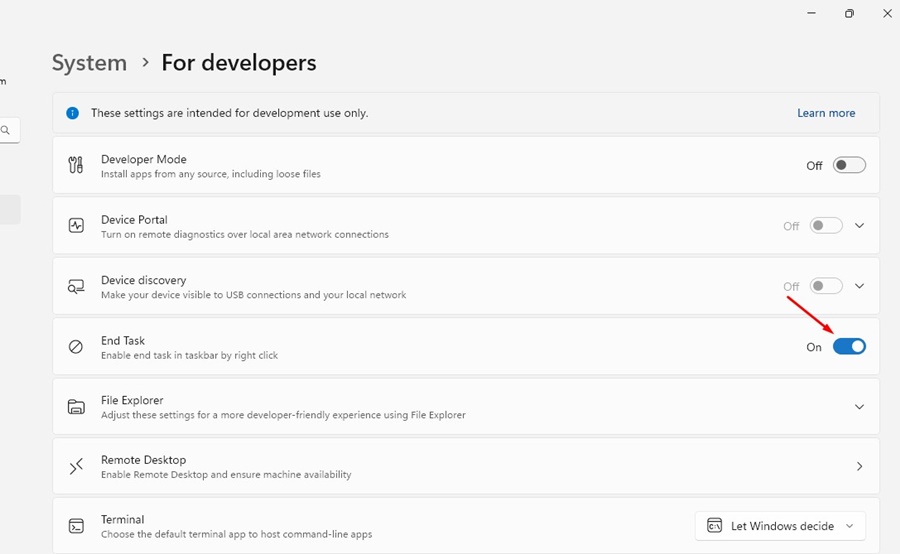
4. On the For Developers screen, turn on the toggle for End Task.

End Task

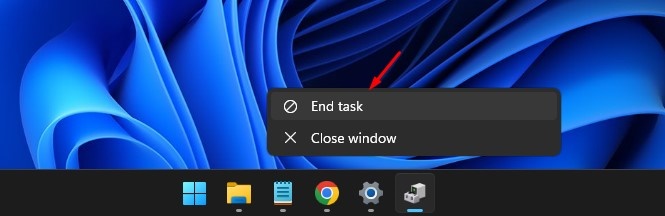
5. This will add the End Task option to your Taskbar menu. To test it, right-click on any running app icon on the Taskbar; you will find a new ‘End Task’ option.

End Task

That’s it! These are the easy steps to adding the End Task option to the Windows 11 Taskbar.

Enable End Task Option on Windows 11 Taskbar Via Registry Editor

If you are comfortable with Registry editing, you can enable the End Task Option on your Windows 11 Taskbar by modifying the value of the TaskbarEndTask Key. Here’s what you need to do.

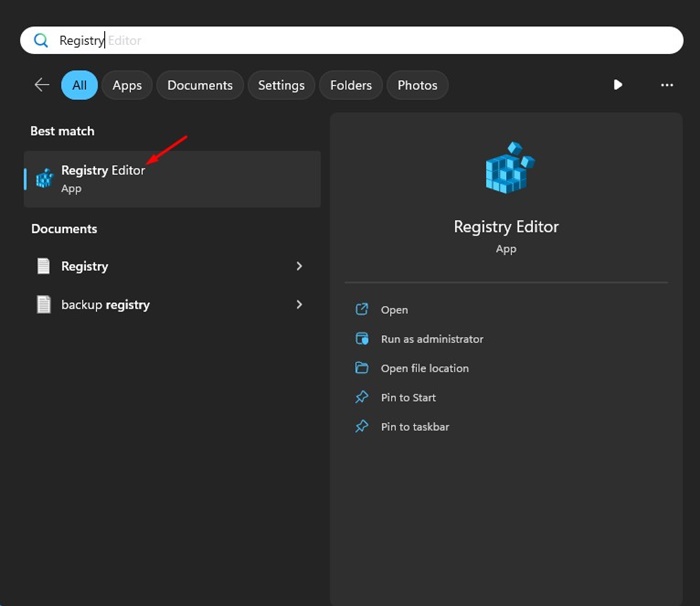
1. Type in Regedit on the Windows 11 Search. Next, open the Registry Editor from the list of best match results.

Registry Editor

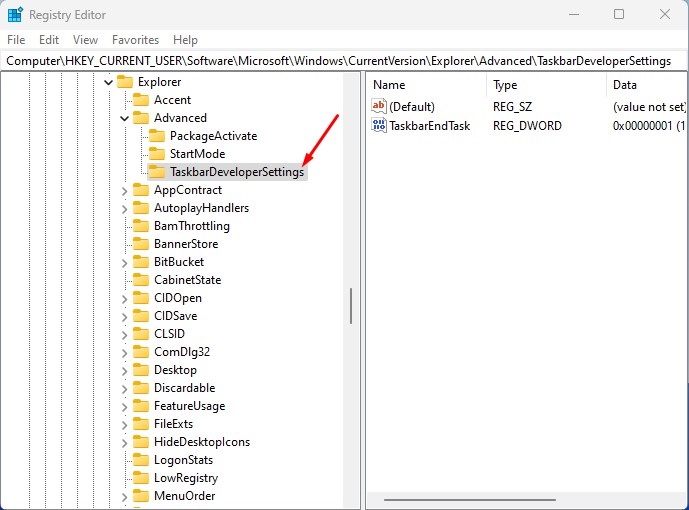
2. When the Registry Editor opens, navigate to this path:

HKCU\Software\Microsoft\Windows\CurrentVersion\Explorer\Advanced\TaskbarDeveloperSetting

navigate to this path

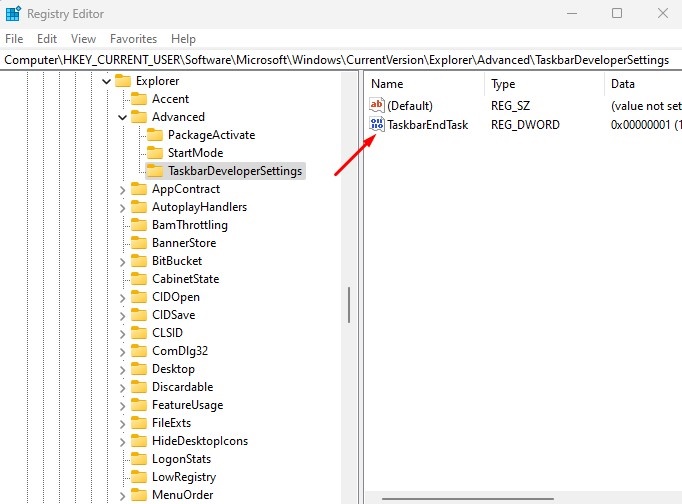
3. On the right side, double click on the TaskbarEndTask DWORD Value.TaskbarEndTask

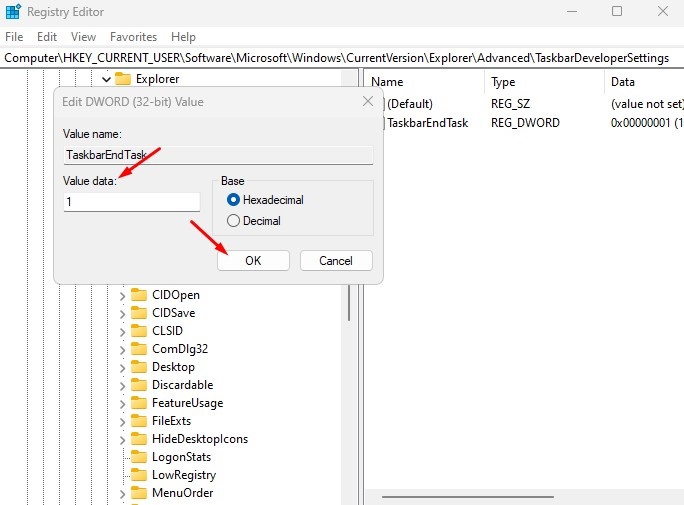
4. On the Value Data field, type 1 and click OK.

1

That’s it! After making the changes, close the Registry Editor and restart your Windows 11 PC. After the restart, right click on any running apps on the Taskbar; you will find a new ‘End Task’ option.

If you often test new programs on your computer, having the End Task option for apps on the Taskbar could be very useful. With the help of the ‘End Task’ button, you can force close unresponsive apps on Windows 11 without accessing the Task Manager. If you need more help enabling the End Task option on the Windows 11 Taskbar, let us know in the comments.

How to Perform Clean Boot on Windows 11

4:45 AM 0

 You can Clean Boot a Windows 11 device to fix various issues like BSOD, driver errors, slow computer, etc. A clean boot is appropriate for many Windows 11 issues since it starts the computer without any third-party app interference.

So, if your Windows 11 PC is acting weird and you don’t know the exact reason for it, you can perform a clean boot. Below, we have discussed how to clean boot Windows 11.

What is Clean Boot?

You can simply take Clean Boot as a technique that starts your PC with minimal sets of programs and drivers. You can perform a clean boot if you doubt certain programs or drivers conflict with the system services and trigger issues.

If the problem persists even after performing a clean boot, it simply means the problem lies elsewhere on your PC.

How to Clean Boot Windows 11

Now that you know what a Clean Boot is, you may want to know how to perform a clean boot on Windows 11. Follow the steps we have shared below to perform a clean boot on a Windows 11 computer.

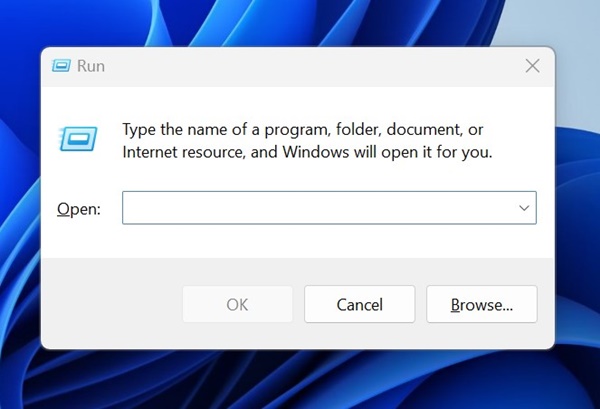
1. To get started, press the Windows Key + R button on your keyboard. This will open the RUN dialog box.

RUN dialog box

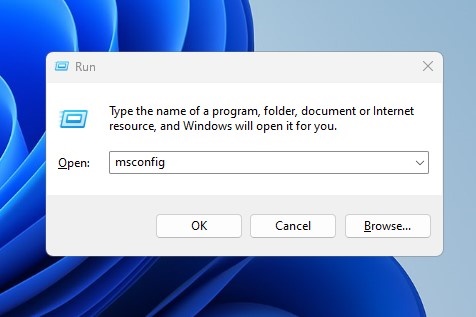
2. When the RUN dialog box opens, type in msconfig and press Enter.

msconfig

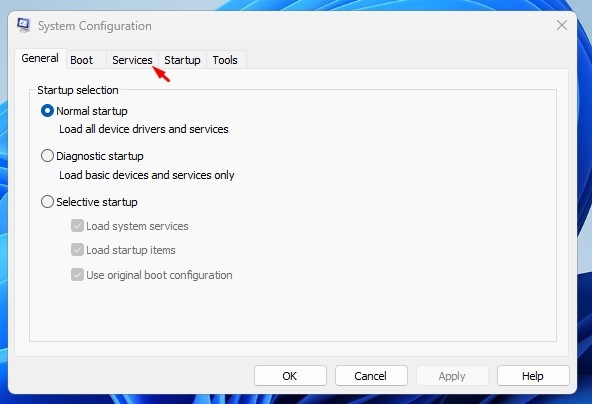
3. This will open the System Configuration utility.

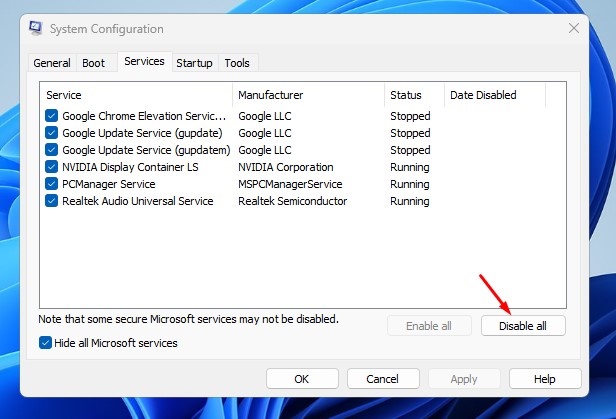
4. Next, switch to the Services tab, as shown in the screenshot below.

Services

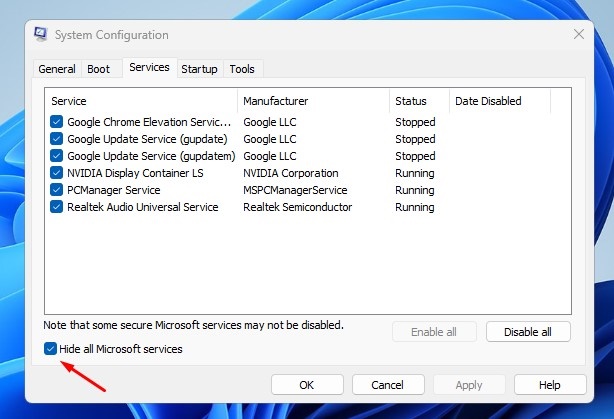
5. At the bottom left corner, check the Hide all Microsoft Services checkbox.

Hide all Microsoft Services

6. Next, click on the Disable All.

Disable All

7. Once done, click on Apply, then OK.

Disable the Startup Apps from the Task Manager

The next step includes disabling the startup programs from the Task Manager. Here’s what you need to do.

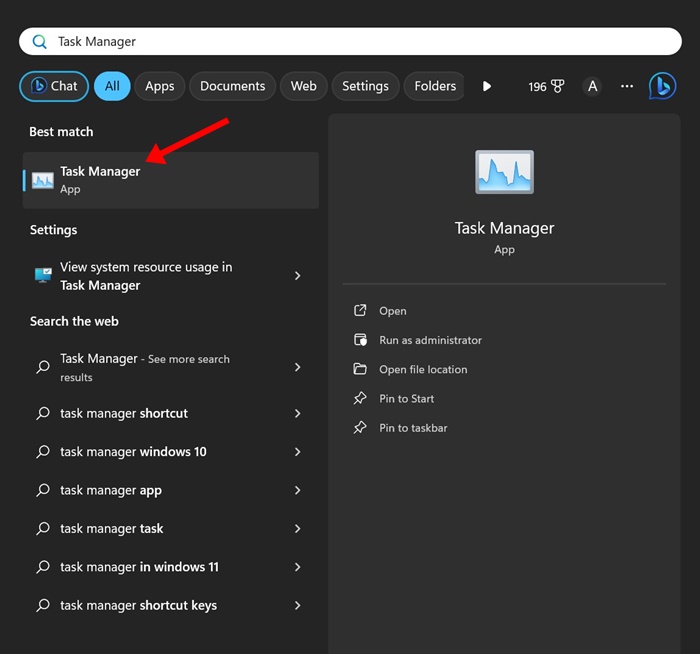
1. Type in Task Manager on the Windows 11 Search. Next, open the Task Manager app from the list of best match results.

Task Manager

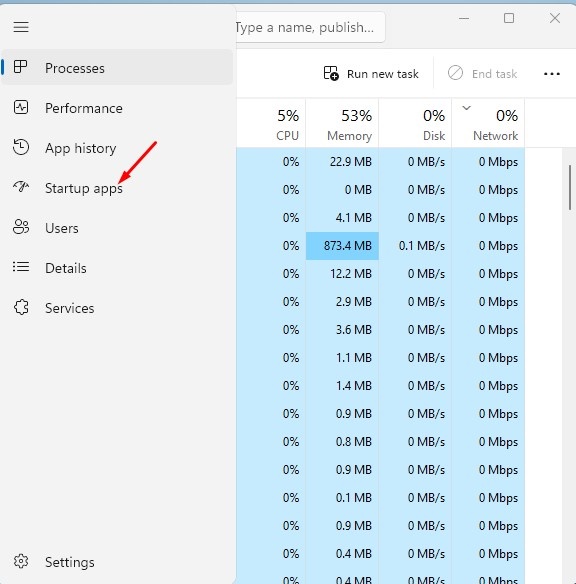
2. When the Task Manager opens, switch to the Startup Apps tab.

Startup

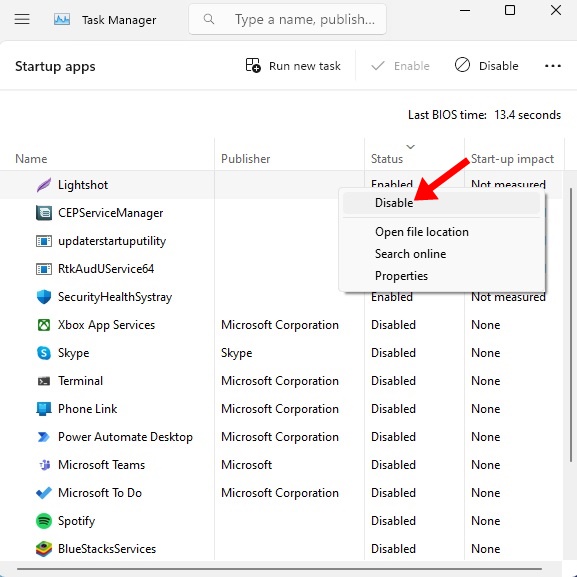
3. You will find many Startup apps there. Right-click on each one and select Disable.

Disable

That’s it! After making the changes, simply restart your computer. Windows 11 will be launched in a clean boot environment; you need to check if the problem persists.

How to Exit Clean Boot Environment on Windows 11

Whether performing a clean boot has fixed your problem or not, you will have to exit the clean boot environment. Here’s how to do so on Windows 11.

1. Press the Windows Key + R button on your keyboard. On the RUN dialog box, type msconfig and press Enter.

msconfig

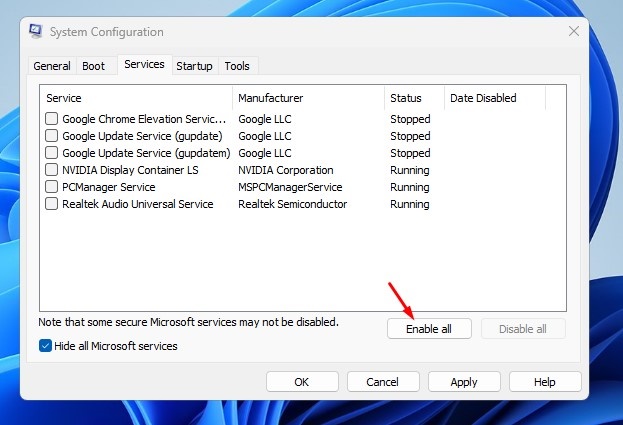
2. Next, switch to the Services tab.

Services

3. Check the Hide All Microsoft Services checkbox and click Enable All.

Services

4. After making the changes, click on Apply and then OK.

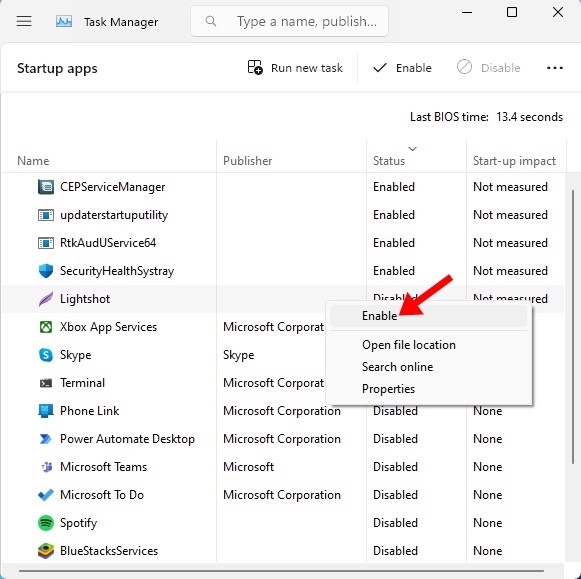
5. Open Task Manager and switch to the Startup Apps.

Startup

6. Right click on the Apps you’ve disabled and select Enable.

Enable

That’s it! After making the changes, restart your Windows 11 PC. Your PC will exit the clean boot environment.

This guide explains how to perform a clean boot on a Windows 11 computer. If you need more help with this topic, let us know in the comments. Also, if this article helps you, don’t forget to share it with your friends.